

Learning to Draw Skin
Learning to draw skin.
So many hues, types and variations.
How to convey that in coloured pencil?
Learning to Draw Skin Requires Patience
There is no quick fix for drawing authentic looking, textured skin with coloured pencils.
This is a skill that requires patience, lots and lots of layers and thinking about the bone structure and muscles beneath and how they move.
Please see the details of the course I took in order to learn these skills by clicking this link.
My tutor was Nestor Canavarro
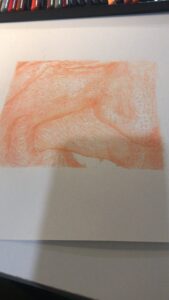
As you can see from this photograph, the first stage was to lay down the light colours. Notice how I have tried to make my pencil strokes move with the skin as it would on the face. I have also paid attention to the places where the pores would be more visible. I started with the lightest colours almost like a dot to dot, emphasising the dark of the pores and leaving some the lightest colours, I am also using a very soft touch at this point, mainly laying down the areas of movement, pores, muscle position and gentle outlines of features. Any areas of white were left untouched (nothing is whiter than the paper remember!). There are 3 layers of colour at this point, flesh/flesh light/chinese orange.
As this was a learning exercise, I used my Castle Arts Soft Touch Pencils. Professional pencils are very expensive because they are light fast – which means they will not fade with time. For a professional portrait I would use pablos but this was just a study in technique.The colours I used in this study were:
- Flesh
- Flesh light
- Chinese Orange
- Indian red
- Cinnamon
- Sepia
- Ivory Black
The paper I used had a good tooth so I could build up the layers. I mostly use Canson for these kinds of studies.
Adding Depth for Realism
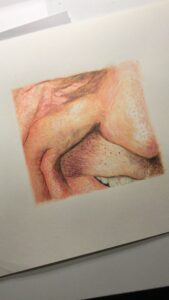
You cannot achieve realism without adding tone and texture. This is where you have to seize the day and get bold with darker hues and add that vital depth. Remember, you are creating an illusion of a 3D structure, so now you really have to think about where the light hits the subject and darken the areas it cannot reach. In close study, the hair on the upper lip does have a specific way of growing. Some hair is under the skin, some is emerging and some has achieved a small length. By varying the pressure on the pencil you can show this. The base layers guided where I placed the hair. I also began to add much deeper colour to the skin folds and fragile skin under the eye. Where I wanted to show the most intense highlights, I simply left the paper untouched.
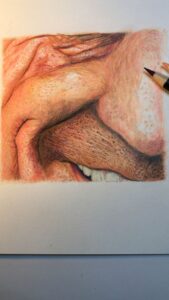
I continued to add darker hues until I achieved the realism and detail I was looking for.
Now all that was left was to bring eyes, lips, hair and skin together and do a portrait.